
A chill is in the air and the trees are ablaze with fiery red, orange and yellow. It can only mean one thing for us photographers; our last busy season of the year is upon us. While you’re cramming in last minute sessions, we wanted to offer our best advice on how to capitalize on the final shoots this year. Sit back, don your chunky sweater and cuddle up to a pumpkin-spice latte, it’s time for our top 7 tips for maximizing your holiday season sales.
Win #1: Take advantage of seasonal sales from your favorite print lab!
Let’s start with the low-hanging fruit in our mission to unearth easy wins during the busy season. One of the easiest ways to increase your bottom line is to simply spend less money. And one of the easiest ways to spend less money is to take advantage of all of these holiday specials your favorite print labs are offering. I know, kind of a no-brainer, right? Well, that’s what we’re going for here! Quick and simple wins to make you more money.
Win #2: Only Edit Photos You Sell
Speaking of spending less money – time is money, right? So if we can spend less time on each session, we’ll spend less money. One of my favorite ways to cut back on the amount of time I spend per session is to only fully edit the images I sell. Now I’m not suggesting you show your clients unedited images, I’m just saying you shouldn’t fully edit all of the images.
We’ll do what I call “Lightroom Edits” on every image because we can do them in batches. This is editing for things like:
- Exposure
- White Balance
- Crooked Horizons (this is critical, most photographers don’t pay enough attention to it!)
In Lightroom, select an image, make your edits, then apply those edits to all of the images with similar exposure and white balance. You’ll be done editing in no time and your images will be ready to show off to your clients ahead of schedule.
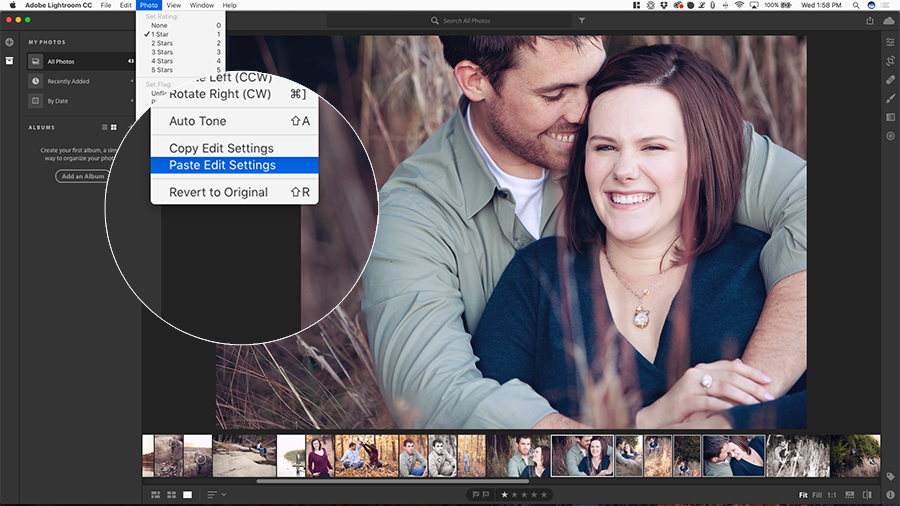
After your sales meeting, go through any images that have been ordered and complete final edits. This would include:
- Artistic Edits
- Removing Blemishes
- Fine Detail Color Balance
- Dodging and Burning
This tip will help you be more efficient in creating proofs for each client and help you increase your output and income. Once you’ve mastered this during the busy season, make sure to implement moving forward. Your photos and clients will thank you!
Win #3: Batch Your Processes
This is another tip that, once you start doing it, you’ll never want to stop. “Batching your processes” means that you’re going to do the same process, step or format at the same time to keep you from having to switch between different projects. With what we do, this is especially hard because we may be switching from right brain tasks like editing and shooting to left brain tasks like selling and placing orders.
So what would batching your processes look like, in practice?
- Saturday and Sunday: Sessions
- Monday AM: Lightroom Edits
- Monday PM: Client Emails
- Tuesday AM: Write Blog Post
- Tuesday PM: Sales Meetings
- Wednesday AM: Reach out to Local Vendors/Expand My Network
- Wednesday PM: Sales Meetings
- Thursday: Final Edits on All Ordered Images
- Friday AM: Place Orders
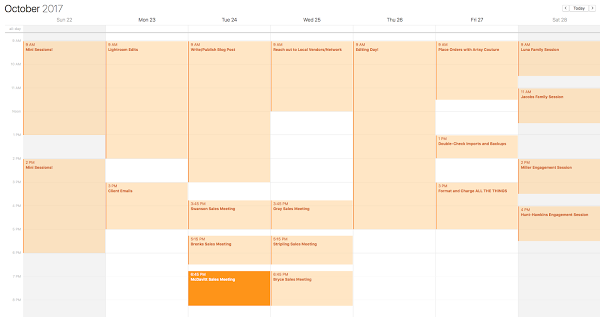
While the above is simplified, you have more things that you need to do each week to grow your business, like follow up with clients, schedule sessions and product deliveries/pickups and constantly check how many new likes that session you posted on Facebook got today. However, doing the same thing at the same time will help you figure out ways to streamline each process and will also help you get your work done more efficiently.
Scenario: It’s Monday morning and your whole house has now left for school and work. You get the “what the heck am I supposed to do today?” feeling you have each morning when you sit down at your computer to work. This is where you’ll find batch processing the most reliable for planning. Is it Monday morning? I do Light-room edits on Monday mornings. I don’t check Facebook. I don’t look at my email. I do Light-room edits.
Win #4: Offer Fewer Products During Busy Season
Another way to dramatically decrease the amount of time you spend per session during busy season is to cut back on the number of products you offer. How does this help? Let’s count the ways!
- You can shoot more efficiently, knowing exactly what products you’re shooting for (“I’m shooting for a gallery-wrapped canvas with the image wrapped around the edges, I need to leave extra space around my subject to keep them from wrapping around the edge, too”).
- Clients have fewer options to choose from, making it easier for them to make a choice and stick with it.
- You have fewer products to have to discuss and sell during your planning and sales meetings, making it faster to zero in on the perfect product for your client.
- You can get faster at editing and create these products while batching your processes since you have fewer products to deal with.
Pairing limited, or Holiday specific items, with a special discount on seasonal specials, is a recipe for a great, streamlined sale. Even better, choose products that have seasonal specials from your lab and now you’re spending less money on your products while also spending less time creating them. Win-win!
Win #5: Create Suggestions Before the Sales Meeting
This is really something you should be doing throughout the year, but it’s especially important to add it during your busy season if you’re not already doing it. Pre-designing suggested products is a fantastic way to cut down on the amount of time it’ll take for your client to make a decision on purchasing your products. And if you’re offering seasonal specials like we discussed in the previous tip, this is super-simple. If your client gets a “seasonal package” that includes a framed gallery, 2 5x7s and a set of holiday cards. Design in advance and you’ll be ahead of schedule and competition.
Best case, they’ll love everything you’ve designed, say “yeah, I’ll take it all” and you’re done.
Worst case, they have you swap out some images and you’re still done faster than you would be if you hadn’t pre-designed anything!
Even more importantly, this sets you up in your clients’ eyes as the expert. You’re the pro, so be the pro! You know this stuff better than your clients, it’s time to start putting it out there and saying, “with my eye, expertise, and experience, these are the images that I think make the most sense for the products you’ve chosen”. That doesn’t mean you’ll have to stick with those if they like something else, but you’ll be surprised just how quickly your suggestions will match their favorites after you do this a few times!
Win #6: Make Album Selections at the Sales Meeting
Busy season is not the time to be waiting week after week for a client to get back to you with their selections for their album! You’ve got lab holiday deadlines to meet and a slew of other clients needing your attention.
Here is what your conversation should look like with your client:
- You: “Ok, for your album, would you like me to just design it from the images you chose as ‘yes’ images today?”
- Client: “Yeah, that works for me.”
- You: “Perfect, I’ll get that designed and ordered this week so we know it’ll be in in time for the holidays!”
- Client: “You’re the best, can I please tip you an extra $1,000!?!”
- You: “I suppose.”

- Ok, so it may not go down exactly like that, but notice what we’re doing here. I’m not even discussing the option to “take them home and think about them” and I never mention a thing about sending them a proof to approve before I place the order. And I’m phrasing it in a way that is a benefit to them: “I’ll get it designed and ordered so you’ll have it in time for the holidays”.
- If they don’t want you to design from the “Yes” images, then it’s time to dig in and decide which ones they want. Do this now so you can be done with it and get the album ordered the same week.
- If they ask for a proof, by all means, tell them you’d be happy to send a proof over, but that you’ll be placing the order on Friday, approved or not. You can explain that this is your busy season and you need to leave time for reprinting if something goes wrong if you want, but that’s totally up to you. Clients will understand and respect that you run a business and have timelines to hit.
Win #7: Make it easy to up-sell products.
Alright, we all know how much photographers hate sales pitches, so this is our final step. You should be well primed to master these sales scenarios after having gone through the previous six steps. Take a deep breath, it’s going to be ok.
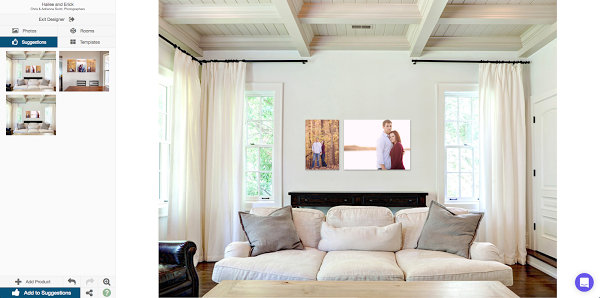
Step 1: Get Prepared
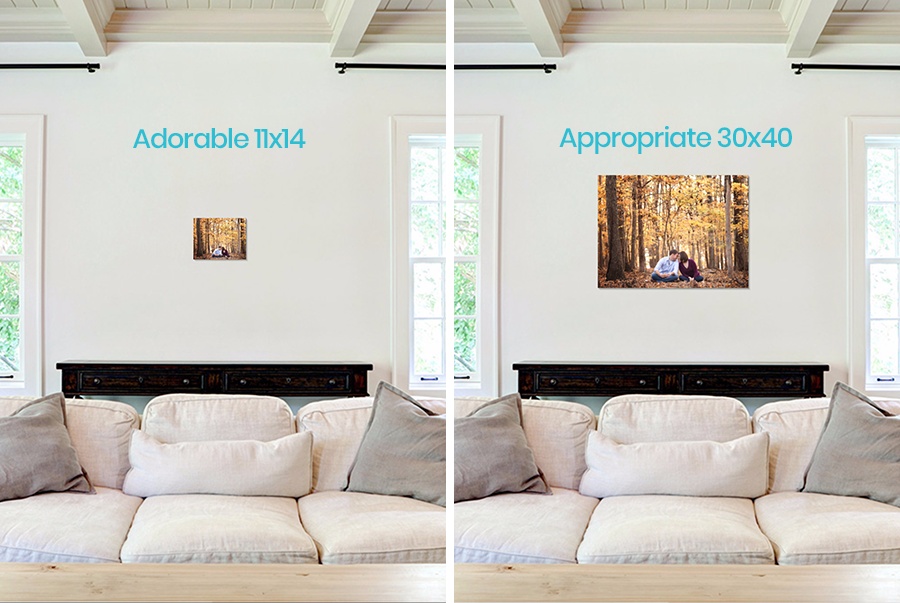
- Let’s say, as part of your seasonal package, you include a “Tabletop 11×14” print (Win #4).
- Since learning how predesign can be so beneficial, you’ve also designed product mock-ups displaying an 11″x14″ proof on a wall space using an imaging tool, like Swift Galleries (see below).
- Outcome: The 11″x14″ print is going to look absolutely adorable on a standard-sized wall. However, this may not fit the needs of the space provided.
Step 2: Give Your Professional Opinion
- Following your above preparation, you also predesign the same proof in a new dimension, 20″x30″ or 24″x36″ is perfect for most shared living spaces.
- At the Sales Meeting, show your client the 11″x14″ mock-up, leading the conversation with:
“This is what comes in your package, but I really think something like this [20″x30″] or this [24″x36″] would look better in your space, what do you think?”
- The response will overwhelmingly be in your favor, and they’ll likely agree that your option is best.
- I’d encourage you to then consider offering a special package to include their new print size/style:
“We’re also running a special on these sizes. We’ll put the cost of your 11″x14″ included in the package toward a different size of your choosing and offer 10% on top.”
Step 3: Deliver the Best
- You can take this same concept and apply it to up-selling from a single wall print to a collection, really easily:
“I like this canvas of the whole family here, but I threw together something that I think you’ll really love. Check this out with the family as the statement piece and a photo of the kids together on one side and you and your husband together on the other side. I think this fills the space better and allows you to get a few more images up on that wall, as well. It really goes a lot further to tell the story of this year, too. What do you think about this?”
- When it comes right down to it, this isn’t selling. This is you working with your client to get the right image, at the right size, on the right product, in the right space in their home.
And that? That’s service.
So there you have it, 7 quick wins for you this busy season to make more money in less time while spending less money. Chime in in the comments if you have any questions or if you give any of these a shot, we want to hear your results!

About the Author: Chris Scott | Swift Galleries
Like this article? You may also be interested in:
- Find Your Fall Focus
- 11 Event Ideas for the Holiday Season
- Pro Photographer’s Guide to Lightroom Editing
